Blogger Widgets

Monday 10 October 2016

The Best and Fail Proof Japanese Castella Cake / Kasutera

If you asked me which is my favourite cake, I really can't tell you .... I love butter cake, marble cake, sponge cake, pound cake, pandan layer cake, and mixed fruit cake too. They are all my favourites. But there is one cake no matter how many times failure I've encountered, I'm still very adamant trying to succeed and I'm countless how many times I've tried; and that cake is castella cake. 

Two years ago I have succeeded baked my first Castella Cake eventhough I don't have that wooden mould at that time.  After my success in this cake, I even have modified the cake into a Coffee Castella  flavour and I really love it!! 

When Zoe of Bake For Happy Kids posted her Castella Cake recently, the word "Best & Fail Proof" just caught my eyes and I would love to try this out as this recipe has an added ingredient of oil inside.  Im sure with the added oil would moisten the texture of the cake more and sure enough!

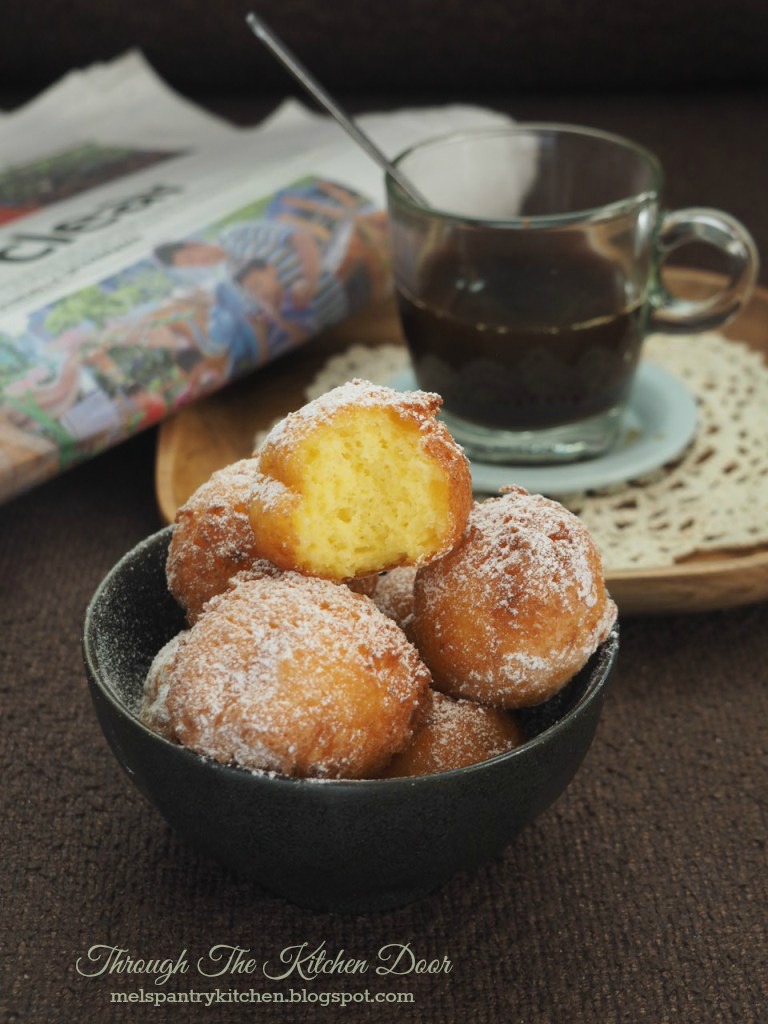
When I bite my first bite of the cake, I was like in cake heaven.... OMG... it was so so so so delicious!!!


The Best Japanese Castella Cake 
Recipe sourced from Bake For Happy Kids

Ingredients

Egg yolk mixture

115g bread flour
45g egg yolks (about 3 medium size egg yolks) at room temperature
60g caster sugar
50g milk
40g honey (or 2 tbsp) honey
30g vegetable oil

Egg white mixture
105g egg whites (about 3 medium size egg whites), at room temperature
60g caster sugar


Method
Place a baking rack in the middle of the oven. Preheat oven to 180°C / 350°F with NO fan forced.

Line the internal sides of your castella wooden mould with grease proof paper and wrap around the bottom of the mould to just above 1” height.

(If you are using a metal loaf pan, fully lined the inside of the loaf pan with aluminium foil then line again another layer with greaseproof paper.)


Preparing for the egg yolk mixture:
Place the milk, honey and oil in a small saucepan or heat proof bowl. Heat the  mixture in the saucepan with low heat under the stove  or microwave mixture in the heat proof bowl with short pulses of low power until the honey dissolves into the mixture. Do not let the mixture boils because the mixture will cause to curd.  Set aside for the mixture to cool slightly, about 10 minutes.

Place egg yolks and sugar in a large mixing bowl and using your hand whisk, whisk the mixture turns pale in colour.  Whisk in the honey mixture.  Sift the bread flour into egg yolk mixture and whisk until everything is combined.  Set aside.

And for the egg white mixture:
Using your stand mixer or hand held mixer with a whisk attachment, beat egg whites in medium low speed until foamy. Increase beating speed to medium and while beating, add in sugar gradually and continue to beat until stiff peaks form and the meringue look glossy. Do not over beat the mixture.

Using a hand whisk or a spatula, fold in 1/3 of the egg whites to the egg yolks mixture. You can vigorously mixture the batter together in this stage but after the rest of the egg whites, please fold in with your spatula gently till no egg white lumps are visible.


Slowly pour batter into the prepared pan at about 1 feet high.   Smoothen the surface and ently drop the pan onto the kitchen bench from a height of 10 cm to remove any large air bubbles and do this just once. If you are afraid of doing this, you can use a skewer to draw a zigzag to remove air bubbles in the batter. You can choose to do either one of these steps or both but do not over-do these steps.

Place pan in the middle rack and bake for 10 mins. Decrease temperature to 140°C / 285°F and bake for another 60 mins, or until the cake is thoroughly cooked and must has a nice golden brown top. 


NOTE:  As all oven temperature differs, please adjust the temperature and timing accordingly.

Remove the cake out from oven and invert the cake to a chopping board for 5 minutes.  Remove the wooden mould out and invert back the cake to another plate or a wooden board. Once the cake slightly cool to touch, peel off the baking paper and wrap the cake in plastic wrap. Place cake in an airtight container or a zip lock bag and allow it to rest in room temperature to let the cake moisten for at least one day.  (The cake taste best after it aged a day).


I think I have done good this time and will stick this recipe for life ..... hahaha!  Look how good the texture of this cake.... it is not crumbly at all  ...  very spongy absolutely loving it!


This is how I lined my wooden mould.
Alternatively, if you do not have the wooden mould, you may use the normal pan and lined the pan like the below two pictures.


Wrap the pan with aluminium foil in 2 layers and lined another layer with grease proof paper.


Using two square pans of 8" and 9", cut out some cardboards and wrap with aluminium foil and slot in between the two pans.  The inner small pan, please lined the bottom with grease proof paper (as I have forgotten to cut out the paper to place in to take photo).

* If you are using the above two method of pans to bake the castella cake the timing should be shorter about 45 to 50 minutes.  Like I said earlier, different oven temperature would result to different timing too.


So what are you waiting for? Try it ...


Monday 3 October 2016

Kuih Puteri Ayu (Steamed Pandan Sponge Cake)

Wanted to make this steamed cake for sometime but was so hesitate to have to buy the mould and moreover it is in plastic.  But just do not know why I still go ahead to get it.  Luckily the moulds was not that expensive ...

Actually it was a picture that I stumbled upon in Instagram that inspired me to make this sponge cake.  But that picture posted was in Pumpkin flavour instead of pandan flavour.


Kuih Puteri Ayu (Steamed Pandan Sponge Cake)
Adapted from Sonia of NasiLemakLover
makes about 13 - 15 medium moulds

Ingredients
2 eggs (Large Size)
100g caster sugar
150g all purpose flour
1/2 tsp baking powder
120ml coconut milk (blend 4-5 pieces pandan leaves together and strained)


Topping
60g - 80g fresh shredded coconut
1/4 tsp salt
1 tsp corn flour


Method
Mix the topping ingredients together and keep aside.
 

Lightly brush the mould with some cooking oil, fill the bottom of the mould with some shredded coconut. Stack 2 mould together and press till shredded coconut is firmly pressed.
 

Sift flour and baking powder together and set aside.

Using your handheld mixer, beat sugar and eggs until fluffy; about 5 minutes.  Slowly add in coconut milk and mix well.  In slow speed of your mixer, slowly add in flour and mix till well combine.
 

Fill the sponge cake mould with batter just slightly below the rim.
 

Steam your cakes for 10 - 15 minutes once your steamer is ready,

When cake turned slightly cool, remove the cake from the mould. 


Enjoy your steamed cake while it is still warm!  I love to have lots of shredded coconut topping!


Tuesday 9 August 2016

Ricotta Bombolini

I'm a big fan of Australia Masterchef and My Kitchen Rules and so does my sister.  By just watching these shows you can learn so much of the different type techniques in preparing and cooking the dishes.  It is just feeling wonderful by just watching the contestants cooking....

Last year when Emma & Jane of MKR presented their dessert to the judges, the judges gave good praises to their Bombolini (I never ever heard of Bombolini that time).  Well, Bombolini or Bombolone is an Italian filled sweet dessert similarly like doughnut balls.  

I have bookmarked this recipe since that episode was aired last year and only today I got the mood to make it!  Because for this, I specially had to make my homemade ricotta.


Ricotta Bombolini (Ricotta Doughnut)
Recipe adapted from MKR Recipes


Ingredients

112g plain flour
50g caster sugar
1 tablespoon baking powder
250g ricotta cheese or Homemade ricotta
2 eggs, lightly beaten
1 tablespoon vanilla extract
Vegetable Oil for deep frying
Caster sugar or icing sugar to coat


Method

Sift the plain flour, baking powder and salt into a medium bowl.  Add in the sugar.  Stir to combined and set aside.

Gently in stir in the eggs, ricotta and vanilla.  Mix till all combined.   Cover the mixture with plastic wrap and refrigerate for 30 - 40 minutes.

In a heavy deep medium saucepan, add and heat up the oil about 4" deep high in your saucepan (enough to allow your bombolini to float in your saucepan).

Drop a tablespoon of the mixture into the heated oil and fry in batches.  Fry till crisp and golden brown; and cooked through. 

Drain on absorbent paper. 
In this stage, you can roll your bombolini in caster sugar or once the bombolini cool down a bit, just lightly dust and coat with icing sugar.


One thing good about this recipe is, you don't need the yeast and wait for hours and hours to proof the mixture.  And yet resulted so soft and fluffy.


These Bombolini (doughnut balls) are so delicious and yummy!  Can you see the texture is so soft, light, moist and fluffy?  I wish I can share this out together with you but I can't, so you got to make this yourself.  


A Courtesy note:
My photos here though are not professional photos but please do not download it and use it without my consent.  Thank you!


Friday 5 August 2016

Pumpkin Milky Sago Dessert

Do you like pumpkin?  And do you know pumpkin is a fruit instead of vegetable.  Or just because pumpkin consist of seeds that it is considered as a fruit.  Pumpkin is very versatile in cooking.  You can used pumpkin as a sweet dessert and you can used it as savoury dish too.

I preferred to use pumpkin as a sweet dessert.  I have made Pumpkin Sago Dessert last year and it taste absolutely heavenly good this dessert.   Today I am posting a very similar pumpkin sago sweet dessert but this time is more diluted watery.


 PUMPKIN MILKY SAGO DESSERT

Ingredients

500gm pumpkin (deseeded &  skin removed, cut into cubes)
100gm sago (tapioca pearls)
100gm palm sugar (gula melaka) or rock sugar (adjust to your sweetness preference)
3-4 blades pandan leaves
1000ml water
1 can (390ml) evaporated milk

Method

Bring a medium pot of water to boil.  Once the water comes to a bubbling boiling, pour all the sago pearls in.  Cook the sago in high heat for about 10 minutes or translucent; stirring constantly.  (do not worry if the sago still has white spot in the middle).
Cover the pot with lid and let it stand for 5-8 minutes for the sago to cook further in the pot.
Using a sieve, run the cooked sago thru running water to remove access starch.  Pour into a bowl and set aside.

Steam the dice pumpkin until soft.
Drain the pumpkin if there's water in it. While the pumpkin still warm, using a potato masher, roughly mash the pumpkin.  (You can blend till fine the pumpkin; but mashing it roughly give some biting texture when you are eating it later). Set aside.

In a clean medium pot, add the 1000ml water, sugar and pandan leaves.  Bring to boil till sugar dissolves.  Boil another 2-3 minutes to bring out the pandan leaves aroma.  Discard the pandan leaves.  
Add in the mashed pumpkin and sago.  Once it's come to a boil, pour in the evaporated milk and immediately removed from heat.  Done!

Serve warm or cold.


For this dessert, I am using this Australian pumpkin; big portion in flesh with little seeds in it...  I love this pumpkin with its dark vibrant in colour though it is quite costly.


One thing good about this sweet dessert is,  you can enjoy either warm or cold whichever way you want.  Taste absolutely delicious and yummy!

Go on, give it a try!


Thursday 21 July 2016

Pikelets

Breakfast is the first meal of the day and and is also the most important meal of the day.  My breakfast is usually light and easy; either cereal or a toast.  But if I am in the mood I will make something special too.

Pikelets.  You heard of pikelets?  Or pancakes should be more familiar to you.  Well, the difference between pikelets and pancakes are the pikelets are made smaller in size than pancakes; about 3" to 4" diameter.  Pikelets are more widely known to New Zealand, Australia and Britain.  The ingredients to make the Pikelets and pancakes are similarly the same; only thing is pikelets are more heavy in texture.

I have made Pikelets for breakfast uncountable times  and my niece has even getting good at her hand making this for us all by herself.


Pikelets

Ingredients

150g self raising flour
A small pinch of bicarbonate soda
55g caster sugar (fine or granulated sugar)
1 medium egg, lightly beaten
180g (or 3/4 cup) fresh milk, approximately


Method

Sift the self raising flour, bicarbonate soda and sugar in a medium bowl.  
Using your hand whisk, gradually stir in the egg and milk whisking to mix into a smooth pouring consistency batter.

Lightly oiled a large frying pan and using small to medium heat, drop one tablespoon of batter into the pan; allowing some room for spreading.  When bubbles started to appear on top, flip the pikelet over.  Cook until it is lightly browned on the other side.
Serve warm with butter or your favourite jam or fruits.


I usually love to drizzle honey or maple syrup to my pikelets and with lots of blueberries. 
Well, Pikelets can be served cold at breakfast time or even at afternoon tea.  


Sunday 24 January 2016

Peanut Cookies

In another two more weeks we will be welcoming the "Monkey" for the coming Chinese New Year.  I am sure those who are celebrating the Chinese New Year, will be busying themselves baking all sorts of cookies.

And my first bake for the CNY cookies is Peanut Cookies.  Though it is quite laborious to make this, I guess it is worth it.  So fragrant and nutty flavour!  


PEANUT COOKIES
Recipe sourced from Food-4Tots 

Ingredients 
300g raw peanuts
250g plain flour
130g icing sugar
135ml peanut cooking oil
15g butter (softened – optional)
Pinch of salt 


Egg Wash 
1 egg yolk (from 1 large size egg; lightly beaten and diluted with 1 tsp milk 


Preparing the peanuts 

Rinse the raw peanuts and pat dry with kitchen paper.
Dry fry the raw peanuts in a big wok or frying pan under medium heat; stir frying from time to time till golden brown.
Remove and set to cool before removing the skin.
Grind the  peanuts till fine or  superfine (to your preference) in a food processor. 


Making the peanut cookies 
In a large mixing bowl, sift the flour, icing sugar and salt together.  Add in to the ground peanut and mix it up all together with a hand whisk.
Add in the butter (if you are using it) and slowly pour in the peanut oil till a smooth dough is formed.  (you may have to add extra oil in in order to combine a smooth dough).

Take a small dough weighing about 8g and roll into round size.  Flatten it slightly with your palm.  Repeat till all dough has finished.
Using your clean ballpen cap, lightly press it to the centre top to imprint a design.

Brush the cookies with egg glaze.
Bake the cookies at pre-heated oven 160Celcius for 15-20 minutes.
Cool before store in an air tight container.


I grind my peanuts till superfine to get into a melt in the mouth texture.