Blogger Widgets

Saturday, 3 November 2012

Raspberry Swirl Cheesecake

Hi everyone and happy weekend to you!

Today post is Cheesecake!  Have you baked cheesecake before?  I bet you do.... I have baked cheesecake before but unfortunately it always turn out to be failures and never got the guts to post it in my blog here!  I guess I am not good in baking cheesecake especially those Japanese types or the cottony soft types!

When I saw Sonia posted her beautiful Raspberry Swirl Cheesecake, I was so swooned over by the swirl she made on the cheesecake and I bet you do too.  Earlier I did saw Jane's Corner  posted hers and she made it so perfectly beautiful too!

Of course, I thought I should get up and do the same.... and you know what today my post of this cheesecake is my third time.  Though I am still not very pleased with it and thought I should go for the fourth time....  but I just go ahead to post it though it is not beautiful as of Sonia's and Jane's ~ they are the pro in bakes!


Raspberry Swirl Cheesecake
Recipe from Sonia's (I half of the recipe as the same in Jane's ) 

Ingredients 
200g Cream Cheese
20g caster sugar
2 Egg Yolks
25g low protein flour
100g Whipping cream

2  Egg Whites
40g caster sugar

½ cup Raspberry filling (store-bought) OR 1 cup frozen raspberry + 1tbsp sugar (Process raspberries in food processor with 2 tablespoons sugar until smooth. Strain purée into a small saucepan. Boil mixture for 3 minutes, until slightly thickened. Cool to room temperature.)

Method
1. Remove whipping cream from fridge, immediate beat till soft peak, set aside.
2. Beat cream cheese with sugar till smooth (I use stand mixer)
3. Add in egg yolks and mix well. Add in flour and combine well.
4. Mix in whipped cream, mix till well combine.
5. Beat egg white till foamy (I use hand mixer), gradually add in sugar and continue to
     beat till soft peaks.
6. Use a hand whisk, mix in 1/3 meringue with cream cheese batter as to lighten the
     batter.
7. Then use a spatula, fold in the balance meringue, fold gently till combine well.
8. Pour batter into cake tin (line paper on the bottom), and make marble effect with
raspberry filling (fill raspberry filling into a piping bag or squeeze out bottle, 
drop small dots scattered the  whole cake, and then use a  pointy skewer to swirl
into the marble effect).
9. Bake at a pre-heated oven at 140C for 60mins at lower rack using steaming bake
method (place a roasting tin underneath and add in hot water before putting in the
cake tin).
10. Cool on a wire rack, remove the cake and chill the cheesecake before consu
ming.


My cheesecake has a bad cracked on top and were slightly browned eventhough I baked it at 130C.  After I let the cake cool in the fridge, I took it out and "repaired" it by squirt out some raspberry filling to cover the crack! 


I warmed up the raspberry filling with some water to make it diluted, strain & sieve it, let cool before pouring into this squeeze bottle and squirt out to the cheesecake.


Though it is not the perfect cheesecake this time round, of course I have so much enjoyed it.

Would I make it again for the fourth time?  You bet!  Who knows, it will be perfect 10 leh....


Thursday, 1 November 2012

Ayam Masak Merah (Chicken in Spicy Tomato Sauce)

I have wanted to cook this Ayam Masak Merah (Chicken In Spicy Tomato Sauce) for so long but only waited till now.  

You see, my house only have 2 sometimes 3 persons, so cooking for a small portion to me is quite difficult.  And when I wanted to cook it, either I am not well (bad cough) or the other family member is on Chinese medicine for a month and so have to wait, and then another had sore throat, blah , blah, blah, and wait till the timing is right for me to cook this.

I am not good in cooking spicy dishes,  and when I prepare the ingredients, blend to paste, fry, saute, add this, add that, and wondering in the end am I doing it right procedure.  But of course, no worries, in the end, the taste do seem real good and delicious!  How I wish the expertise to help to taste and comment for me...

Lisa. , actually I wanted to use fresh milk in this but do not know whether it feels right or not and in the end I still go ahead with the coconut milk ~ hee...hee....just trying to cut down my cholesterol level since doctor said it is high after my last check up.

So, herewith my post today is Ayam Masak Merah (Chicken In Spicy Tomato Sauce)


Ayam Masak Merah Recipe 
Recipe from Lisa of From My Lemony Kitchen
Serve 8-10
(I cooked half portion of this recipe)
 
Ingredients:
2 x 0.9-1kg chicken, cut into 8 pieces/chicken
20 dried chillies, soaked
2 red onion
5 cloves of garlic
40g ginger
25g galangal (lengkuas)
5 lemongrass
2-3 star anise
4 cloves
3 inch of cinnamon
3 cardamom
1 can of tomato soup
1 can (400ml) coconut milk
Salt to taste
Vegetable oil for deep frying plus ¼ cup extra
1 cup of peas, optional


Method:
Preparing Chicken
Rub chicken with turmeric and salt. Set aside for 30 minutes. Heat up the oil in a wok and deep fry the chicken pieces until golden in colour. Set aside.
Roughly chopped red onion, ginger, galangal and lemongrass, then transfer to a blender or food processors. Add in chillies and garlic. Process into a paste.

Heat up the wok with ½ cup of oil. Sauté the spices : Cinnamon, star anise, cloves and cardamom until fragrant. Then add in the blended paste. Bring the heat up until the paste bubble then lower the heat. Simmer till the paste is thoroughly cooked, fragrant and the oil separates from the paste (pecah minyak). 

Add in canned tomato soup, coconut milk and chicken pieces. Bring up the heat for a quick boil, then lower to a simmer and cook until the sauce thickened. Add peas and season with salt to taste. 

Garnish with some spring onion before serving.


So, was it good?  You bet, two thumbs up!!  Taste much more better eating with your hands!
Aah, another dish to go with extra rice......... 


Friday, 26 October 2012

Terengganu Braised Chicken ("Kay Hong")

In my last post, I mentioned that after my medical check up the doctor told me my cholesterol is high and suggested that I should take caution first in my diet and do some walking in my free time.

Well, it is true that we should not take our health for granted; as long as I take cautious in my daily diet I should not get too paranoid about all this.

                                                             *********************

When  Phong Hong Bakes, posted her Braised Chicken earlier, I do find it unique because she uses chicken as well as pork belly in this dish.   I usually cooked braised meat either chicken or pork belly itself and not both in together.

So, I told myself why not to give it a tryand while the meat is slow braising, I steal a sip of the sauce, oh wow, it just taste so delicious!

But my oh my, as talking about health conscious,  pork belly, chicken, eggs,..... aren't these high in cholesterol and with fats?  No worries, I will skim off the upper layer of oil out


Terengganu Braised Chicken ("Kay Hong")

Recipe from Phong Hong Bakes

Ingredients
2 chicken legs (cut into bite sized pieces)
200g pork belly (cut into 1 inch slices)
6 hardboiled eggs (1 only boiled 2 eggs)
15 shallots
3 cloves garlic
2 tbsp preserved bean paste (taucheow)
2 tbsp sweet soya sauce (I used ABC dark sauce)
2 tbsp dark soya sauce
Palm sugar (gula Melaka) to taste
700 ml water (adjust for consistency, use less for thicker gravy)

Method
Blend shallots, garlic and taucheow. Saute the blended paste until fragrant.
Add pork belly and fry for about 10 minutes.
Add water, sweet soya sauce, dark soya sauce, gula Melaka and hard boiled eggs.
Bring to a boil and simmer for 30 minutes before adding chicken.
Simmer until chicken is cooked and tender.


Anyone intend to cook this dish, I highly advise that to cook extra rice, okay?
But look at that layer of fat....got to skim that off now!
 
Phong Hong, thank you for this, it is indeed very delicious!


I am submitting this post to Malaysian Food Fest Terengganu Month


Wednesday, 24 October 2012

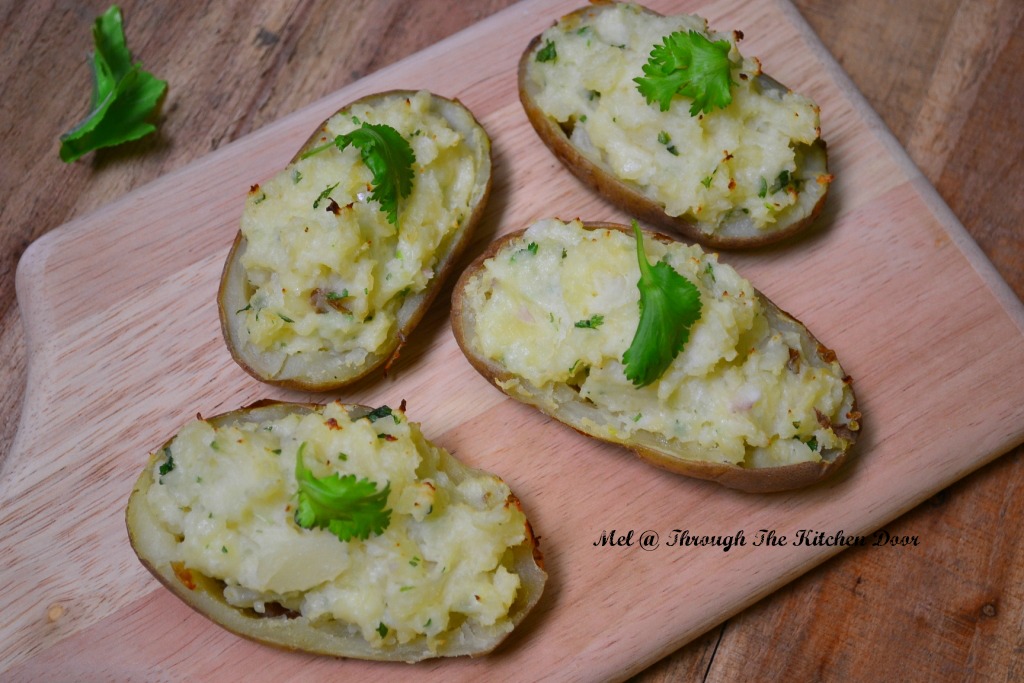
Twice-Baked Potatoes

(Sigh!)...... Everything seem not right for me today.

Last week, went for check-up (blood/urine/stool/pap-smear) and the doctor called me today and said the result is out and briefly told me that my cholesterol is high!  Oh dear...... the first thing came to my mind is.... I can't bake anymore cakes in future?
Oil, butter, eggs, cream........all these are high in cholesterol!

While talking to my doctor on the phone, actually I was half way baking a cheesecake.  At after 45 minutes, my oven just suddenly turn off by itself.........duh......WHAT HAPPENED?!!!!   Try to turn on and turn off...... So fed up......  so you should know what the outcome of my cheesecake then... fed up!

Today I am posting, Twice-Baked Potatoes.  Potato, whichever way to cook it, it is still my favourite.  


Twice-Baked Potatoes

Ingredients
4 baking potatoes (Russet), about 225gm
150ml heavy cream
1 tbsp lemon juice
2 garlic cloves, chopped/mince
1 shallot, chopped/mince
85ml vegetable stock or water
3 tbsp chopped fresh basil (I used coriander)
2 tbsp grated parmesan cheese (I forgot about this here)
Salt and pepper to taste


Preheat oven to 190C.

Scrub the potatoes and prick the skins with fork.  Rub a little salt into the skins and place on a baking sheet.   
Bake / cook the potatoes for 1 hour or until the potatoes are cooked through and the skins crisp.

Remove the potatoes from the oven and cut them in half lengthways. 
Using a spoon, scoop the potato flesh into a mixing bowl, leaving a thin shell of potato inside the skins.  Mash the potato flesh with a fork.

Meanwhile, mix the cream and stock in a saucepan and simmer for 8-10 minutes or until reduced by half.  
Stir in lemon juice, garlic, shallot  and chopped coriander, season with salt and pepper.
Stir the mixture into the mashed potato.

Spoon the mixture back into the potato shells and sprinkle the cheese on top. 
Return the potatoes to the oven for 10 minutes or until the cheese has browned.
Serve with fresh salad.


Tuesday, 23 October 2012

Cranberries/Raisins Pai Pau (Bread)

When I saw Sonia  posted this Pai Pao, I just wanted to make this as I love the softness of the bread.  

Well, I don't have cream cheese in my fridge but what I have left over is just sour cream and thought of just used it instead.  I wanted to make this just using Raisins alone but I don't have enough and put in half cranberries and half raisins in.


Cranberries/Raisins Pai Pao (Bread)
Recipe adapted from Sonia of NasiLemakLover with some changes

Ingredients
50g sour cream 
20g dried cranberries
20g raisins
280g bread flour/ high protein flour
40g caster Sugar
120g fresh milk
40g egg
1tsp instant dried yeast
28g butter, soften at room temperature

Egg wash-balance egg +1tsp milk

Method (using hand knead)
1. Place all ingredients except butter & cranberries into the same mixing bowl, mix well with
    wooden spatula till all come together. Start to knead till dough becomes smooth.
2. Add butter and continue knead till dough becomes smooth, glossy and elastic (pass thru
    window pane test).
3. Add in cranberries/raisins and gently incorporate into dough.
4. Place dough in a clean bowl and cover with cling wrap, let it proof till double size.
5. Remove dough from the bowl, gently press the dough to remove air bubbles. Equally divide 
    dough into 6 portions ( about 90g each). Roll each into small round dough ball, continue to rest 
    for 15mins.
6. Roll small dough into an oval shape, and roll up like swiss roll, press firm on the closing.
7. With the closing facing down, place it on the non-stick baking pan (10”x 10”). 
    Repeat the rest till finished. Continue to rest till double in sizes.
8. Apply egg wash, bake at pre-heated oven at 180C for 20mins.
9. Cool bread on a wire rack. Store in air-tight container to maintain softness.


I knew I didn't knead long enough to achieve the dough to window pane but just nearly there; well call me an amateur but I will work harder next time.  
So for the meantime, I will just enjoy as it is with my cup of tea! 


Sunday, 21 October 2012

Chocolate Checkerboard Cake

It is my dad's birthday today and I have baked him a Chocolate Checkerboard Cake!  

I hope this cake is not too much for him having with loads of eggs, butter, as well as having chocolate for topping.


Being a first timer baking this checkerboard, I can say is not too bad ..... eventhough it is not really that perfect, not well trim off the edges,  not well smoothen on the sides with buttercream,  but at least I have made a birthday cake for dad.

Well about the recipe for this cake, I am a little lazy typing out the recipe ingredients and method but do hop over to Masam Manis and her tutorial photos on how to cut out the rings and assemble the cake.  Her cake is so neat and perfect.

But if anyone wants to know more on the recipe, let me know and I shall try to translate it out to English and type it out for you..... but now I need a rest after doing this cake ....LOL... 


When cutting out the rings from the layer cake, really need your delicate hand to take it out (with cautious tender care than handling a baby), or else the ring will break.  But no worries, you can always patch it up with the buttercream and no one will know it was broken half way the ring.


The steps to bake this cake are .........

1)  Make & bake the plain sponge
2)  Make & bake the chocolate sponge

3)  Make buttercream
4)  Cut the cakes into layers, and from layers cut to 3 rings
5)  Start assemble the cake, spread buttercream
6And finally...make chocolate topping..... and pour over to cake
7)  Decorate cake

Phew!  Was that easy?  Hee.....hee......


My dad said it is delicious and I was relieved........


Will I make this cake again?  Of course....mmm....maybe....  if I feel or have the mood again but I would like to try another method of making the sponge cake and the buttercream next time.


Wednesday, 17 October 2012

Mille Crepe With Vanilla Cream Custard

When I first came across this Mille Crepe in the website, I think it is really amazing and cool.  The crepes (to me I usually called it pancake) can be assembled up to become a cake itself. 

Though I have not really eaten this Mille Crepes before though alot of people has been raving how delicious it was.  So I got to try it out.  


MILLE CREPE WITH VANILLA CREAM CUSTARD
Adapted from Masam Manis

CREPE 
140g   Cake flour
20g     Corn flour
80g     Caster sugar
500g   Milk
30g     Butter
4         Egg yolks
1Tsp   Vanilla Essence
Pinch of Salt

1. Combine cake flour and corn flour in a bowl.
2. Add in 1/2 of quantity of milk needed bit by bit as you incorporate it into the flour with a whisk. Keep whisking until a smooth batter is obtained. Set aside.
3. In a separate bowl, whisk egg yolks and sugar with the remaining milk.
4. Pour #3 into #2 bit by bit whilst whisking.
5. Add in melted butter and mix till well combined.
6. Sieve mixture into a bowl.
7. Cover with cling wrap and allow to rest in the fridge for 30 minutes before using the batter.
8. Heat a non-stick frying pan with medium high heat.
9. Once the pan is throughly heated, reduce heat to medium low .
10. Melt 1 tbsp butter in the heated frying pan and wipe off excess with a kitchen tissue.
11. Using a ladle, spread pancake batter thinly onto the frying pan.
12. Once the pancake starts to "bubble" and the top surface of the pancake starts to firm up, remove immediately from heat. There's no need to fry the other side of the pancake.
13. Place pancake on a clean flat plate. Repeat process with remaining batter. While stacking pancakes, make sure you separate each layer with greaseproof paper to make sure they don't stick together. Allow pancakes to cool.


Vanilla Cream Filling
200ml whip cream
450ml milk
2 tbs flour
85g sugar
1 1/2 tbs cornstarch
4 egg yolks
2 tbs butter/margarine
vanilla essence

How-to (crepe)
1. Sift flour+baking powder together. melt butter and put aside.
2. In a separate bowl, mix eggs + 250ml milk + sugar well. add the flour mixture and amix well 

    until combined. add in vanilla and the rest of the milk,  combine.
3. Add in melted butter and mix again. cover and let the batter rest inside the fridge for   
    30 minutes- 2 hours.
4. Heat a nonstick pan and slightly oil the surface. wipe any excess oil. pour in a ladle full of your 

     crepe batter and spread evenly as thin as possible. cook for 30 seconds and flip the crepe upside 
     down and wait for 10 secs. remove your crepe from the pan and cover with a cling wrap to 
     keep it moist.
5. Repeat  until you finish all the batter. you should get around 20 crepes. put the crepes aside to 

    let them cool down.

How- to (filling)
1. make the custard.
   -using a heatproof bowl, heat milk in the microwave for 3 minutes. sift in cornstarch and flour, 

   add in sugar and quickly whisk well to avoid lumps . add the egg yolks gradually and combine. 
   Put back the bowl of mixture into the microwave and reheat until it gets bubbly. take out and 
   whisk the batter and reheat again. repeat this 3 times for a total of 5 minutes. take out the bowl, 
   and add in butter and vanilla and mix well. leave it to cool .
2. In another bowl, beat cream at medium speed until cream starts to thicken, continue to beat 

     until you get a soft peak.  Fold in the cream into the cooled custard until well combined.

Assembling the cake
lay one crepe on a cake base / flat plate and spread the custard filling evenly on the surface. (not to thick) cover the filling with another crepe and repeat until you have used all the crepe. put your cake in the fridge for 3-5 hours to let it set and serve it cool. 


Though it was not 'beautifully done', I just console myself, it is alright.  At least I have done it.  hee...hee....


It is quite tiring doing this Mille Crepes........... I can sleep soundly tonite. 

Wednesday, 10 October 2012

Curry Chicken With Roti Jala

Whenever I wanted to try something new that I have never eaten or cooked before, I always end up a mess in the kitchen.  And in the end I will take some time to clean up but it is okay to me as long as I love what I am doing.

There are many recipes that I wanted to try and when I have said this, you should know of the long list I have bookmarked.  I even have different folders created up of the recipes I intend to cook and bake.  But sometimes at home, we just have 2 or 3 person so it is difficult to cook for a small portion of dish.  So sometimes when I see a recipe which I intend to bake or cook, I usually have to calculate, reduce/half out the recipe to cook for small portion.

And today, my lunch is Curry Chicken with potatoes; and to go with Roti Jala instead of rice.


Curry Chicken With Potatoes

Ingredients
1 pack curry paste (about 100gm)
300gm chicken pieces
2-3 shallots
2-3 potatoes, cut into big pieces
1 tomatoes (optional)
1 lemongrass, white part and pounded slightly
2 tbsp oil
150ml water
100ml coconut milk or fresh milk
Some curry leaves

Method
Heat up a sauce pan and add in oil.  Saute the shallots till fragrant and lightly brown.  Add in the curry paste and fry till aromatic.

Add in the chicken pieces, lemongrass and curry leaves.  Stir fry about 1 – 2 minutes before adding in the water.  Cover and lower the heat to medium.  Once the chicken gravy comes to a boil, add in the potatoes and the tomato and simmer for about 20 minutes or till the chicken becomes tender.

Pour the coconut milk or milk in.  Once it comes to boil, off the heat.
Serve hot.

Roti Jala (Net Crepes)

Ingredients
1 cup all purpose flour
¾ cup water
¼ cup milk
1 egg
1/2 tsp tumeric powder
Pinch of salt
3 tbsp oil

Method
Mix all the ingredients together and combine till there is no lumps in the batter.
Sieve the batter and pour into the “Roti Jala mould”.  (I used the Japanese Mayo plastic bottle.

Place a non stick frying pan over medium heat.
Squeeze out the batter in vertical and horizontal over to the pan.  Once you see the batter is cooked, quickly fold the crepe and roll it up.

Repeat the process till the batter is finished up.