Blogger Widgets

Thursday, 14 June 2012

Braided Bread Rolls

If I happen to come across any cakes or bread recipes using poppy seeds, I usually will bookmarked it.  And this is one of it.  


Braided Bread Rolls
Adapted from Grown To Cook

Ingredients
500 g all-purpose or unbleached flour
½ tsp dry yeast
300 ml milk, tepid
50 g cold butter
½ tsp salt
Glaze:
1 egg yolk, lightly beaten
poppy seeds or sesame seed (to sprinkle on top)

1)  Dissolve the yeast in the milk (the milk must not be too warm or the temperature will kill 
      the yeast). Keep about 100 g flour apart and put the rest in a large bowl. 

2)  Make a well in the center and pour in the warm milk. Mix in some of the flour to make a 
      sponge in the middle of the bowl. Slice the butter and put the slices around the sponge 
      the warmth of the sponge will soften the butter slightly and make it easier to
      incorporate)  and sprinkle the salt on top of the butter. Cover the bowl with plastic and 
      leave for about 20 minutes, until bubbles have formed. 

3)  Then mix everything together and knead until the dough feels silky and smooth. Add as 
      much of the flour as necessary to keep the dough from sticking, but no more ( you will 
      probably not use all the flour). 

4)  Cover the bowl and set aside to rise until doubled in bulk, an hour or more depending on 
      the room temperature. Because of the butter content, it is better to let the dough rise
      in room that is too warm.

5)  Divide the dough into 10 or 12 equal pieces. Roll each piece of dough into a tight ball by 
      rolling it on a wooden surface under the palm of your hand while pressing your thumb 
      from the side. It is easier to roll the dough on a surface that has not been dusted with 
      flour.

6)  Roll each ball into a rope, about 30 cm long and make a ball like thicker at both ends . Do 
      this gradually, letting the dough rest for a little while between rolling. Fold the ropes 
      (pleasego to here), twist one side into a loop and pull it over one of the ends.
    
7)  Preheat your oven to 225 degrees Celsius.

8)  Put the rolls on a baking sheet covered with parchment and let rise loosely covered with 
      plastic, about 20 minutes or until they almost double in volume. Glaze with the egg yolk 
      and sprinkle with the seeds, if desired.

9) Bake for 15 to 20 minutes, until golden. Let cool on a wire rack.


    Serve with your favourite jams and butter. 


    Hello there, I'm Chef M, care for a piece?  Have one please............. 

Tuesday, 12 June 2012

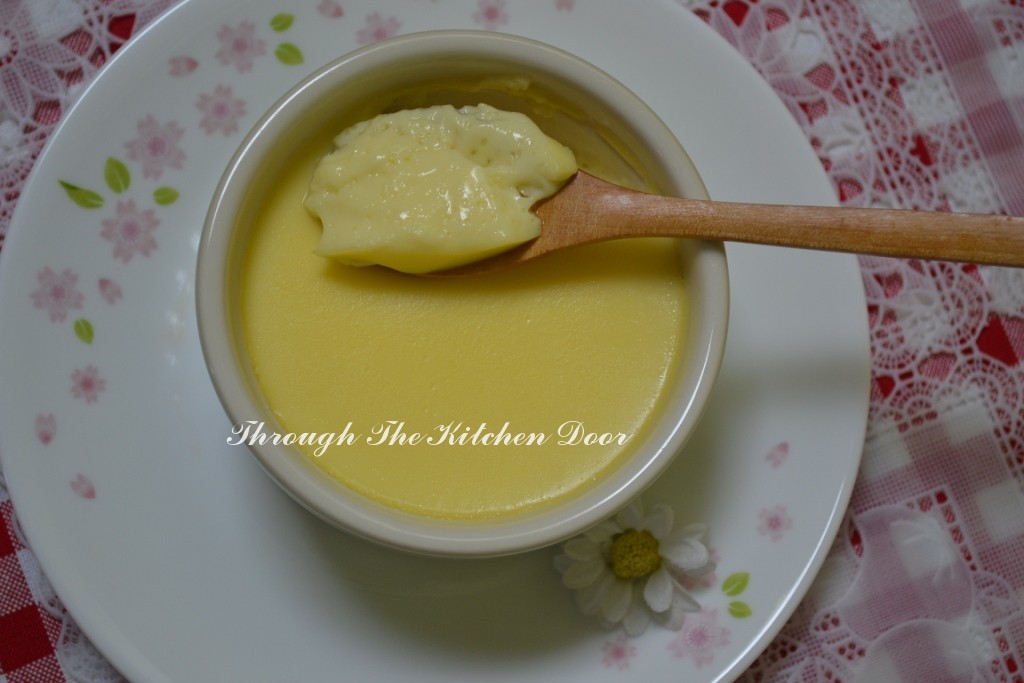
Steamed Egg with Milk Custard (鮮奶燉蛋)

I loves to eat dessert especially pudding whether it done by baking or steaming.  And I know my mum loves dessert the most.

I done my first pudding when I am still studying in the Home Science class.  I remember that time, after I've finished baking that egg pudding, I brought it back home for my mum to taste and she immediately loves it.  After that, I totally forgotten how to make it till now though it is so easy to make.  Herewith, after been lapse for so long, this is the steamed egg with milk custard.

I don't know whether this is something similar with the Hongkee used to eat "Dun Tan" or not; but correct me if I am wrong.

 
STEAMED EGG WITH MILK CUSTARD

Ingredients
3 eggs
170ml fresh milk
150ml water
60gm rock sugar
3-4 slices of ginger


1. Boil the water with the rock sugar and ginger slices till sugar dissolves.
2. Pour in the milk to slightly heat it up.  Let the syrup cool for about 10 mins.
3. Meanwhile, heat up a steamer,once the water boils, lower to medium heat.
4. Lightly beat the eggs and add in the warm syrup, mix well.
5. Strain the egg mixture into ramekins and remove any foam from the mixture.
6. Cover the ramekins with a piece of foil, place them in the steamer.
7. Steam over medium heat for about 20 to 25 minutes till custard is set.
8. Served warm or chilled.


 If you like egg tart, this pudding is something similar like that.


Wednesday, 6 June 2012

Winter Melon Puffs / Wife Cake / Lou Poh Paeng 老婆餅

I would like to convey my thanks for my fellow bloggers who send condolence message to me.  Well, life has to move on and though Big Bro has left, he will always stayed in my heart as and when I want to remember him. I have get on my feet again to brush off from my stress and grief from the issue that affected me recently. 

Let's talk about food which I believe it is everyone favourite topic instead.  When I bookmarked a recipe if I happened to come across the food that may bring memories to me or I have longed never eaten it, I would thought I will make it the next day.  Usually it will end up baking or making something else.  And the one that I bookmarked will be all backlog way behind or sometimes long forgotten.

And today, I am posting this "Winter Melon Puffs" which is well known to the Chinese as "Wife's Cake", Lou Poh Paeng.  Frankly speaking, I have never eaten this "Lou Poh Paeng" before.  It just all happened that one day H brought back some biscuits from Penang; the famous Ghee Hiang's Phong Pneah.  It is so yummy as this is the type of puff that I like to eat.  I have to look for a similar recipe to end my craving.  So, this is why I end up making this Lou Poh Paeng.

And I can say, I will make this again, only to omit the sugar in the filling ingredients.


Winter Melon Puffs / Lou Poh Paeng 老婆餅
Adapted with slight changes from Corner Cafe

Chinese Flaky Pastry:
Water Dough:
70g bread flour
70g plain flour
25g caster sugar
55g lard or shortening
70ml water, adjust as necessary


Lard Dough:
70g cake flour
35g lard or shortening


1 egg, lightly beaten for eggwash

Winter Melon Filling:
200g candied winter melon
糖冬瓜
20g white sesame seeds
10g dessicated coconuts
30g caster sugar  (next time I will omit this, as the winter melon already sweet)
40g cooked glutinous rice flour
糕粉
1/8 teaspoon salt
1/2 teaspoon canola oil
55ml water


 [Preparation]
Winter Melon Filling:
1. Dry roast sesame seeds over moderate heat in a frying pan for 3-5 minutes, or until
fragrant and lightly brown. Cool then grind into powder using a mortar and pestle.

2. Finely chop the candied winter melon, or blend in a food processor (if using food
processor, add toasted sesame seeds, dessicated coconut and blend together with
candied winter melon).
Add ground sesame seeds, sugar, cooked glutinous rice flour and salt. Stir in oil.

3. Gradually add water and knead the filling to form a slightly sticky dough.

4. Divide the filling into 14 equal portions, cover and set aside while preparing the
Chinese flaky pastry.


Chinese Flaky Pastry:
1. For the Water Dough: Put both types of flour, sugar and lard in a mixing bowl, mix
briefly to incorporate the lard. Slowly add just enough water to form a soft but non-
sticky dough. Knead until smooth, form into a ball, wrap in cling film and put into the
refrigerator for about 20 minutes before using.

2. For the Lard Dough: Rub lard into the flour and then knead into a soft dough. If it is
too soft, chill in the refrigerator to harden a bit. If it is too hard, knead it a bit more
until you get soft dough about the same pliability as the water dough. It is important
that the malleability of the lard dough should be about the same as the water dough
when making the Chinese flaky pastry.

3. Divide the water dough and the lard dough respectively into 14 equal portions each
and round them all into small balls.

4. Take a piece of water dough and a piece of lard dough. Roll out the water dough into a flat 
    circle. Place the rounded lard dough in the centre of the flat circle.

5. Gather the outer edges of the water dough circle and wrap up the lard dough ball.

6.  Pinch and seal the edges. 

7. With the heel of your palm, gently press the dough down to flatten it lightly.
8.  Using a small rolling pin, roll out the dough.
9.  Roll the dough up Swiss-roll style.  Make sure to roll it tight.
10. Turn the rolled dough 90 degrees.
11. Roll out the dough again.
12. Roll up Swiss-roll style again
13. Cover the dough and rest for 15 minutes and then it is ready for filling and shaping.
14. With the heel of your palm, gently press the dough down to flatten it lightly.
15. Roll out the dough.
16. Place filling in the centre.
17. Gather the outer edges of the dough circle and wrap up the filling.
18. Pinch and seal the edges making sure the seal is tight.
19. Turn the dough upside down so the sealed end is underneath.
20. With the heel of your palm, gently press the filled dough down to flatten it lightly. Use a 
       rolling pin to roll out the dough to a flat circle, making sure not to roll too thin as to 
       squeeze out the filling.
21. Prick the surface with the tines of a fork (or more traditionally use a knife to cut two slits
      on the surface) to allow steam to escape during baking.
22. Arrange the pastry apart on the lined baking sheet. Eggwash the surface of each pastry.
23. Preheat oven to 200°C. Line a baking sheet with baking paper. Bake for 16-18 minutes, 
       or until the puffs are golden brown in colour.

If you are not sure how to roll up this Hidden-Layering flaky pastry, please go to Corner Cafe on her step to step tutorial picture; here it is Chinese Flaky Pastry 


Other than the filling is a little too sweet ( will omit the 30g sugar next time), this Lou Poh Paeng is delicious and yummy, crispy and puffy.......  You may pack individually pieces in plastic wrapper to keep it stay fresh longer.

I'm sure some of you may know there is "Husband Cake" too.  Maybe one day I might bake that as well.....

Thursday, 31 May 2012

Mixed Dried Fruit Cake


May 31st, 2012 
The sky turn gloomy, and it started to rain heavily right after we heard the news.  We know this day will come but it is just hard to digest it when it had happened and this day has finally come.  And today, we had really felt it when we lost someone dear to all of us in the family.

Yes, my Big Bro has left us…….after battling with lung cancer and brain tumour. 

When there is life, there is death.  When a life is born, we cheers and smiles for the birth, but why when there is death, sorrow and tears we have to shed? 

And today, I would like to share with you this Fruit Cake.  Why Fruit Cake?  I remember many many years ago, my Big Bro called up to my mum and asked her about how to make the Fruit Cake that my mum used to baked. He asked for the ingredients and the steps how to go about it.  So I guess it is the Fruit Cake that he must have liked. 

We will miss you forever..... 

Here, this Fruit Cake is for you my Big Bro……


Sorry, no recipe to accompany....


Tuesday, 29 May 2012

Pandan Layer Cake

I thought I won't be baking this few days as one of my close family member is very sick and the thought of him just really sadden me.  Things at home has not been going very smoothly but I thought this is life.  We are bounds to go through life in ups and downs.

So instead of just sitting feeling depressed and stressed of family issues as well, I might as well brush off the thought from just feeling sad.  Hence, I go ahead to bake this Pandan Layer Cake as I have been studying learning how it be well baked and assemble.  I once again have to search  with others' recipes and my "Agnes Chang - I Can Bake" cookbook, and in the end I decided to use this as I have not bake any one of the recipe from her book.  

Actually this cake I have bookmarked it for quite some time because my niece Tiffany loves this Pandan Layer Cake very much.  So I have to start learning so that one day I can make this for her.

Tiffany, so for now, you just have to see but unable to taste it but one day M will bake it for you!  I promise.


Pandan Layer Cake
Adapted from Agnes Chang - I Can Bake cookbook with slight changes


Ingredients for the cake:
250 gm. Optima flour or sponge cake mix flour
4 eggs
3 Tbsp. Pandan juice
a little green pandan paste or green colouring  (I omit this)
3 Tbsp. Thick coconut milk (I omit this and replace with water)
1 1/2 Tbsp. cornoil

Ingredients for Pandan Kaya:
600 ml. Coconut milk
300ml pandan juice
9 Tbsp. Hoen kwee flour / green pea flour
1 Tbsp. Instant Jelly Powder
1/2 tsp. salt
a little green colouring  (I omit this)
a little pandan paste  (I omit this)
160 gm. sugar  (I still find it sweet, can omit to 140g)

50 gm. Dessicated coconut for covering cake

 
Method for the Sponge Cake:
1.  Beat sponge mix flour and eggs till light.

2.  Add pandan juice and continue to beat till fluffy.  Add in green colouring if necessary.
     Mix in water (or coconut milk) and corn oil till well combined.
    
3.  Pour into a lined and greased 9” round baking tin and bake in a preheated oven at
      170C for about 35-40 minutes, till cooked.

4.  Remove the cake from the oven and leave to cool.  Slice cake horizontally into 3 slices.


Method for the Pandan Kaya:
 1.  Put all the ingredients into a pot and mix well.

2.  Using medium heat, stir with wooden spatula and cook till mixture has slightly
      thickened.  Remove.

3.  Keep mixture hot by putting the pot in a pan of hot water to prevent it from setting
      too quickly.     
      (I have divided the kaya into 3 equal portions).

 
To Assemble :
1.  Place a 9” cake ring on a cake board, put 1 slice of cake into the cake ring, making sure
     there is space all around for the pandan kaya.

2.  Put one portion of the kaya to cover the cake and sides.  Repeat the same way till the
      Last layer is covered with pandan kaya.

3.  Leave aside to cool and set before chilling in the fridge for at least 4 hours, best over-
     night before removing the cake ring.

4.  Next day, decorate the sides and top of the cake with dessicated coconuts before
      serving.


Overall I am pleased with the result of this cake BUT one thing is when I assemble the cake, the cake ring is slight bigger than my 9" cake.  Actually I know of it but just doesn't want to spend extra $ to buy a cake ring for this purpose!  :-)  You can see the sides of the filling is more thicker than on the layer part.


Actually I think I can cut down more on the coconut milk to 600ml or to 700ml and add extra pandan juice in it.  Too much coconut milk is no good lol......

The smooth and velvety pandan kaya layer combined with the soft sponge cake make this cake an all time favourite among all, I guess.......

Friday, 25 May 2012

Little Butter Buns (also known as Roti Paun)

Sometimes looking at other food bloggers making bread and buns really urge me to try but I know I am not very good in making this as it needs a lot of kneading in order to make it into a soft texture.  I don't have a bread maker and sometimes wasn't sure how long it need to knead it in the mixer.

I have bookmarked this Little Butter Buns from the "Agnes Chang - I Can Bake" cookbook for quite awhile and one day I saw Sonia of NasiLemakLover post this recipe.  I was comparing both her recipes and Agnes Chang and decided to use Sonia's recipe because she used with the Gelatinised Dough.  So I thought I should try it.


Little Butter Buns
Adapted from Sonia's Blog with a little slight changes


Gelatinised dough
100g bread flour
70ml hot boiling water

1. Place flour in a mixing bowl.
2. Add hot boiling water and mix with wooden spoon to form a rough dough.
3. Cover bowl with cling film and leave dough to cool in the fridge for at least 1 hour, and up to 48 hours.

To prepare Basic sweet bread dough

300g bread flour
100g plain flour
80g sugar
1 tbsp instant yeast
½ tsp salt
175ml cold milk
1 cold grade A egg
60g cold butter, cubed

1. Combine flours, sugar, yeast and salt together in a mixing bowl.
2. Tear the gelatinized dough into pieces and add to the bowl along with the eggs
3. Using a stand electric mixer, mix on low speed, adding cold milk gradually.
4. Mix until dough is well combined and leave the sides of bowl.
5. Add in the cold butter cubes and mix on medium speed until dough is smooth.
6. Shape dough into a ball, leave to proof for 40mins or until doubled.

Butter filling                                                                   
100g butter, room temperature
40g icing sugar

1. Mix butter and sugar in a small bowl, stir to combine.
2. Place in the fridge (to harden) before use.

To assemble roti paun
1. Divide and shape bread dough into a small ball weighted 30g each.
2. Spoon 1tsp of butter filling and wrap inside the small dough ball.
3. Place dough ball in a greased 9” round cake tin (removable base).
4. Once completed, set aside to rest for 15mins.
5. Apply egg wash & sprinkle some sugar on top of the dough balls
6. Bake at preheated oven at 180c for 20-25 mins.
     (I baked at 160C).


   The butter filling went up on top instead in the middle!  Overall it is yummy when it is still 
    warm.

  When I remove it out from the oven, I brush the top with some "left over" butter which
   I melted to give the buns some shine on top.


Tuesday, 22 May 2012

Ham And Spinach Quiche

Tarts, pies and quiches are my favourites but I hardly make them because I always thought making the crust would takes up some time.    I remember the first quiche I have eaten was many many years ago when I was still working in Petaling Jaya. 

I have made a Crustless Tuna & Ham Quiche before somewhere  last year, but I was not happy with the outcome.  Probably I am still new in my cooking and baking.  

Since everyone at home loves to eat tarts, pies and quiches, why not I try to make it.   And for quiches, I can always add ingredients to suit our tastes instead to follow the same old ingredients.


Ham & Spinach Quiche
Adapted with slight changes from Rima of Bisous A Toi

Crust
190g flour
¼ tsp salt
120g butter
1 egg yolk

Filling
1 small onion, finely chopped
125g spinach, chopped
100g ham
3 eggs, beaten
200ml milk
200ml cream
75g grated cheddar cheese
1 tbsp olive oil
Salt & black pepper

1.  Place a baking tray in oven and preheat oven to 220C.

2.  To make pastry.
      Sieve flour and salt in food processor.  Cut butter in cubes, give it a few pulse till well
      Blended.  Add egg yolk and continue to pulse till it form smooth dough.  Remove and
      Knead on a lightly floured surface.  Shape dough in a ball and wrap in clingfilm and
      Chill in fridge for at least 30 minutes.

3.  Roll pastry out in a circle on a lightly flour surface and use a line 20cm greased tart tin.

4.  To make filling.
      Heat oil, fry onion till brown, add spinach and fry for 5 minutes over gentle heat in a
      non stick pan.  Spoon into the tart tin.  Add and scatter the ham over.  

5.  Using your mixer, beat the eggs, add in your milk and cream, then add most of the
      grated cheese with some salt and black pepper and beat again.  Pour mixture over to
      ham/spinach and scatter the remaining grated cheese on top.

6.  Bake for 10 minutes, then lower temperature to 190C and continue for 30-35 minutes.

Overall this quiche is delicious though the look of perfection is not to the standard.

Next time I will try to bake with other ingredients.

Monday, 21 May 2012

Pumpkin Fritters

I have bookmarked this recipe for quite awhile but only till now I managed to make it.  I don't usually cook food in deep fry way because I can get heaty very easily.

Pumpkin is a very healthy food and we can use pumpkin in many ways of our cooking, be in in sweet dessert or in savoury ways.  


Pumpkin Fritters
Adapted from Gourmand Recipes 

1 cup coarsely grated pumpkin  (I grated too fine)
½ tbsp salt
1 ½ cups all purpose flour
1 tsp baking powder
1 tsp dried yeast
½ tsp sugar
2/3 cup milk
1 egg, lightly beaten
¼ cup, finely chopped coriander
1 red chilli, finely chopped
½ tsp ground black pepper

 
1.  Place grated pumpkin in a bowl and scatter with salt.  Cover and set aside
     For 30 mins.  (this step is to extract the moisture from the pumpkin).
     Squeeze extra liquid from the pumpkin and set aside.

2.  Combine the flour, baking powder, yeast and sugar in a large bowl.  Mix in the
      Milk and egg.  Stir in the pumpkin, coriander, chilli and ground black pepper.

3.  Cover and set aside in a warm place till double in size (about 1 hour).

4.  Heat oil in deep fryer (about 180C).  Deep fry 1 tablespoon full of the batter, in 
      batches, turning once until golden.

5.  Drain on paper.  Serve with your favourite dipping sauce.


 Indeed a delicious "afternoon snack" or out for a picnic!


Thursday, 17 May 2012

Strawberry Cake...... Oh, not again!!

I wasn't prepared to post this Strawberry Cake..... must be bored of me keep making Strawberry Cake lately.  But anyway, still put it up to my blog here.

I loves the colour of this cake, rose red.  I was so impressed when I saw Grace post this Rose Bouquet Strawberry Birthday cake; of the piping out the rose frosting.  So beautiful.  Wish I can do that.....

Well, I just make it simple frosting on my cake.


Strawberry Cake
Adapted from Apron Of Grace

Ingredients
  • 1 cup Butter(227g)
  • 2 & 1/2 cups Sugar  (I used 330g only)
  • 2 Egg Yolks
  • 5 Egg Whites
  • 1 teaspoon Vanilla Extract
  • 1 teaspoon Red Food Coloring
  • 1 & 1/4 cups Pureed Strawberries
  • 3 cups Cake Flour, sifted (375g)
  • 1 teaspoon Baking Powder
  • 1 teaspoon Baking Soda
  • pinch Salt
  • 1 cup Buttermilk
Method
  1. Preheat oven to 180C.  Grease and line 2  9" round cake pans.
  2. In a medium bowl, beat butter with sugar for 3 minutes.
  3. Add egg yolks one at a time, then the vanilla, food coloring and strawberries, beat for another 3 minutes.
  4. Sift dry ingredients and add to butter/egg mixture alternately with buttermilk, beginning and ending with the dry ingredients.
  5. Mix just till combined.
  6. In another bowl and clean beaters, beat egg whites till stiff and add in an increment of 3 to cake batter, being sure to fold in thoroughly but gently.
  7. Pour batter equally to the 2 cake pans.  Bake for 20-25 minutes or till skewer comes out clean. 

For the Frosting, I used the same frosting from my Red Velvet Cake.
Cream Cheese Frosting
125g cream cheese
50g unsalted butter
80g icing sugar
1 cup fresh cream, whipped until stiff

1.  Beat cream cheese with butter until soft.
2.  Turn mixer to low speed, add icing sugar a little at a time, whisk until well
      blended.
3.  Add whipped cream, stir through with a spatula.


Overall the cake is moist inside.  Well, this cake is very suitable for a birthday cake if you wish to bake for someone birthday!!

Friday, 11 May 2012

Siew Pau (Flaky BBQ Pork Bun)

I have been craving for this "Seremban Siew Pau" eversince few months back, when my brother-in-law's friends came to visit and brought us a box the famous Seremban Siew Pau!  So instead of going all the way to Seremban to buy this delicious Siew Pau (Flaky BBQ Pork Bun), I guess I have to make it myself!

I searched for the recipe through the websites and finally found one and bookmarked it.  I've been studying it for weeks on how to knead and roll the water and oil dough together to get the flaky type.  And also watching this Video Pleating Pau for umpteen times to learn how to pleat the pau.

And, finally I spend almost 2 and half hour completing this Siew Pau though wasn't to my satisfaction of the pleating of the pau.


Seremban Siew Pau (Flaky BBQ Pork Buns)
Adapted from The Waitakere Redneck's Kitchen
Makes about 9 paus

Ingredients
Water dough
60g all purpose flour
60g bread/high grade flour
40g cooking oil
18g sugar
½ tsp golden syrup
60g water (minus 1 Tbsp)

Oil dough
62g all purpose flour
37g vegetable shortening

Method
1. Water dough
    Rub oil with flour until it looks like breadcrumbs.
    Dissolve sugar and syrup in water and add to the above. Mix together to form a smooth dough. Cover
    and rest for 15 mins.
    Divide dough into 9 pieces.

2. Oil Dough
    Rub shortening gradually into the flour to form a soft dough. Cover to rest for 15 minutes.
    Divide dough into 9 pieces.

3. Wrap oil dough into water dough and flatten.
4. Roll out into a longish flat piece. Roll up like a swiss roll.
5. Turn 90deg., and repeat .

Please go to Waitakere Redneck's Kitchen's site to learn the step by step on how to roll the dough here.

6. Press dough with palm and lightly roll out into a circle.
7. Place filling in the center (do not put too much filling in), wrap and pleat into a pau shape. Place on a 
    greaseproof paper.
8. Brush pie with egg wash and bake at 190C for 20-25 minutes or until golden brown.


Filling For Siew Pau

Ingredients
125 gm "Char Siew" (bbq pork) (chopped into small pieces)
5 Tbsp frozen peas
chives or spring onions (optional)
2 tsp oil

Seasonings
3 Tbsp water
¼ tsp sesame oil
1½ tsp oyster sauce
2 tsp sugar

3/4 tsp dark soy sauce
½ tsp cornflour
1½ tsp peanut butter
dash of pepper
dash of chinese wine

Method
1. Mix seasoning together
2. Heat oil, add seasoning and simmer till gravy thickens.
3. Add bbq pork and the rest of the ingredients. Mix well
4. Remove and leave to cool before using as filling.

Note : Leftover filling can be eaten with rice or frozen for future pau making.


The video which I have viewed umpteen times looks easy on the pleating but once I'm on hand to do it, it was difficult for me.  The pau still open its mouth when half way baking.


 Can you see some of the pau opened its wide mouth?


Though my pleating isn't perfect, the overall of this Siew Pau is very very delicious.  See the flaky part....
Making pau and bread is not my specialty as I know I still have a lot of room to improve to make it perfect.  Well, at least I have tried..........  Give me some praise please...............