Nowadays we used Matcha (Green Tea) in our baking, dessert, dishes, mooncakes, etc; anything you can come of with. This Matcha Ice Cream is absolutely yummy. Do try it if you get hold of green tea powder as the ingredients are just milk, sugar and cream in it only. Simple and absolutely delicious!
Matcha Ice Cream
adapted from Nami of Just One Cookbook
Ingredients
1 cup whole milk
1 cup cream
1/2 cup sugar
3 tbsp Matcha (Green Tea powder)
Pinch of salt
1. Freeze your ice cream bowl for 24 hours.
2. In a medium sauce pan, whisk together the milk, cream, green tea powder, sugar, and salt. Heat the
mixture till it comes to a full boil. Keep whisking until mixture starts to foam, then remove from heat.
3. Pour the mixture to a large bowl to cool down. Refrigerate the mixture until completely chilled.
4. Next day, pour the mixture to the ice cream bowl and churn for 20-25 minutes in the ice cream maker,
according to manufacturer’s instructions. Transfer into a container and freeze for at least 3 hours before
serving.
I urge you to try it, absolutely delicious!
Tuesday, 20 September 2011
Monday, 19 September 2011
Croquette
Most of the time when we were asked what is our favourite food at all times, we would usually said "My mother home cooked dishes!" or we would said, "My mom makes the most delicious ........something like this too". When my parents moved to Auckland, I have always craved for our mom's home cooked food. So sometimes when I try to cook something similar to what my mom used to cooked, sometimes it doesn't turn out the same taste and I will have to call to her and asked her what is missing in my dishes! This is the life how is when we stay away from our beloved mom.
When I'm in my childhood, my mom used to cook simple western style dishes for us. Eventhough it is done in a simple way of cooking, I still love my mom's home cooked dishes though time have changed whereby we can alter and create many ways putting different ingredients in them.
Croquette is one of the 'snack' my mom used to make for us. Hers is more simple than what I am making today. My mom's croquette has alot of love in it! I was at my sister's house in Spore last week and I make this croquette for all of us to savour...... I will make this again for my mom when my next visit her in Auckland next year.
This delicious Croquette I have made is adapted from Nami - Just One Cookbook
Ingredients:
4 russet potatoes, boiled and roughly mashed
1 large onion, finely diced
1 small carrots, finely diced
2 Shiitake mushrooms (optional)
2 Tbsp. oil
450g ground meat (beef/chicken/pork)
1 egg
1 tsp. salt
¼ tsp. white pepper
Freshly ground black pepper
2-3 eggs, lightly beaten (put into a shallow plate)
2 cup Panko/breadcrumbs (put into a shallow plate)
½ cup flour ((put into a shallow plate)
Oil for deep frying
1. In a large skillet, heat oil on medium high heat. Put in the onion and sauté until soft. Add carrots and
Shiitake mushrooms and cook until they are soft.
2. Add the meat and break it up with a wooden spoon. When the meat is cooked, add salt, white pepper,
and black pepper. Turn off the heat.
3. Add the meat mixture to the mashed potatoes and mix all up well together with the 1 egg in. Let it rest
to cool down a little so you have worked with your hands later on.
4. As the mixture is still warm, start making your Croquette balls. You can form it into a balls and flatten it
or make it in a longer shape. Any shape to your desire.
5. Dredge each croquette balls into the flour - egg - breadcrumbs.
6. Deep fry the croquette till golden brown only.
Everyone can make croquettes and it is so easy to make. My dad help me to deep fry it! Thanks Dad!
It is best to steam or microwave the potatoes instead of boiling, so the mashed potatoes won't be that wet.
My dear niece is enjoying her piece of croquette made by her Aunt Mel!
Sunday, 18 September 2011
Madeleines
It been quite awhile I have not updated or publish any post as I didn't have the mood to bake or cook anything special. Well, in fact I did, I've baked a fruit cake and some mini buns. Just doesn't have the mood spending time taking shots from it.
And today, I bake Madeleines. First time baking madeleines and......... first time tasted what is a Madeleines!!
The Madeleines ingredients called for .....
2 eggs
100g icing sugar
1 grated orange zest (original recipe called for lemon zest)
100g cake flour
20g ground almond
3g baking powder
100g unsalted butter (melted)
1 tsp vanilla essence
1. Sieve flour and baking powder.
2. Whisk eggs with icing sugar. Add orange zest and ground almond, whisk till soft peaks.
3. Fold in flour and baking powder.
4. Stir in melted butter, bit by bit.
5. Mix in vanilla essence.
6. Pour batter into a bowl and shrink wrap it to refrigerate for 12 hours.
After 12 hours or more.......
7. Preheat oven to 200C.
8. Brush the madeleine molds with melted butter and sprinkle flour onto it. Tap the pans to remove excess
flour.
9. Remove batter from fridge and spoon the batter into the madeleine molds.
10. Bake in oven for 3 minutes thereafter reduce to 180C for 10-12minutes or till skewer comes out clean.
11. Unmold and cool on rack.
See the hump? That is normal....... a hump on the back! Can't stop and resist myself from munching away as I busy taking pictures of it. Munch, munch, munch and it taste delicious when it is fresh out from the oven.... Want one?
And today, I bake Madeleines. First time baking madeleines and......... first time tasted what is a Madeleines!!
The Madeleines ingredients called for .....
2 eggs
100g icing sugar
1 grated orange zest (original recipe called for lemon zest)
100g cake flour
20g ground almond
3g baking powder
100g unsalted butter (melted)
1 tsp vanilla essence
1. Sieve flour and baking powder.
2. Whisk eggs with icing sugar. Add orange zest and ground almond, whisk till soft peaks.
3. Fold in flour and baking powder.
4. Stir in melted butter, bit by bit.
5. Mix in vanilla essence.
6. Pour batter into a bowl and shrink wrap it to refrigerate for 12 hours.
After 12 hours or more.......
7. Preheat oven to 200C.
8. Brush the madeleine molds with melted butter and sprinkle flour onto it. Tap the pans to remove excess
flour.
9. Remove batter from fridge and spoon the batter into the madeleine molds.
10. Bake in oven for 3 minutes thereafter reduce to 180C for 10-12minutes or till skewer comes out clean.
11. Unmold and cool on rack.
See the hump? That is normal....... a hump on the back! Can't stop and resist myself from munching away as I busy taking pictures of it. Munch, munch, munch and it taste delicious when it is fresh out from the oven.... Want one?
Labels:
Cakes
Friday, 16 September 2011
Baked Cassava Cake / Tapioca Cake (Bingka Ubi)
Cassava. Tapioca. They are the same. I remember I used to eat this Baked Tapioca Cake way back when I was still staying in my hometown. It tastes real good. After I left my hometown, I don't get much opportunity to have this delicious snack. Well, just today itself while shopping in Singapore, one bakery shop selling this Baked Tapioca Cake at the cost of 90 cents per piece.
Even if you manage to find this snack at the night market which could be slightly cheaper about 50 cents per piece, they might not be as good. So I thought why not I make this myself and my family members can enjoy this delicious cake together. Ah....since Wendy of Table for 2...or more is also from my hometown, I should look for her blog for this recipe though I have many cookbooks consist of this recipe. I shall try for her recipes first!
1.2kg Cassava /Tapioca (after peeled and grated, weigh about 900gm more or less)
200gm sugar
200ml thick coconut milk
200ml water
2 eggs
40gm butter
A few drops of yellow colouring
1. Peel and grate the cassava. If you are using white cassava, which could be slightly bitter, press out juices
into a container and let the juice stand until the starch settles to the bottom. Pour the upper juice into a
measuring cup to separate the water from the starch. Measure the cassava water and discard it. Substitute
the discarded amount with clean water. Combine the clean water, starch and grated cassava. Add some
yellow colouring if desired.
(If you manage to find yellow cassava, you do not need to go for this step of discarding the juice
out and replacing it with clean water as indicated by Wendy).
2. Mix the coconut milk and eggs together.
3. Boil water and sugar till dissolved and melt in butter. Pour this hot solution into the grated cassava and stir
to combine. It should thicken slightly.
4. Pour the coconut milk/eggs mixture into (3). Stir well to combine.
5. Pour batter into a lined grease proof paper into a 7 inch square baking pan and bake in a preheated
oven at 170/180C for 1 hour or until golden brown.
This is the second time I baked this, I find this time was a little too soft and wet eventhough I've baked it for more than an hour. I should reduce the water the next time round. (Amended at the ingredients level water to 200ml instead)
Even if you manage to find this snack at the night market which could be slightly cheaper about 50 cents per piece, they might not be as good. So I thought why not I make this myself and my family members can enjoy this delicious cake together. Ah....since Wendy of Table for 2...or more is also from my hometown, I should look for her blog for this recipe though I have many cookbooks consist of this recipe. I shall try for her recipes first!
Baked Cassava Cake (Bingka Ubi)
fully adapted from Wendy's Blog1.2kg Cassava /Tapioca (after peeled and grated, weigh about 900gm more or less)
200gm sugar
200ml thick coconut milk
200ml water
2 eggs
40gm butter
A few drops of yellow colouring
1. Peel and grate the cassava. If you are using white cassava, which could be slightly bitter, press out juices
into a container and let the juice stand until the starch settles to the bottom. Pour the upper juice into a
measuring cup to separate the water from the starch. Measure the cassava water and discard it. Substitute
the discarded amount with clean water. Combine the clean water, starch and grated cassava. Add some
yellow colouring if desired.
(If you manage to find yellow cassava, you do not need to go for this step of discarding the juice
out and replacing it with clean water as indicated by Wendy).
2. Mix the coconut milk and eggs together.
3. Boil water and sugar till dissolved and melt in butter. Pour this hot solution into the grated cassava and stir
to combine. It should thicken slightly.
4. Pour the coconut milk/eggs mixture into (3). Stir well to combine.
5. Pour batter into a lined grease proof paper into a 7 inch square baking pan and bake in a preheated
oven at 170/180C for 1 hour or until golden brown.
This is the second time I baked this, I find this time was a little too soft and wet eventhough I've baked it for more than an hour. I should reduce the water the next time round. (Amended at the ingredients level water to 200ml instead)
Labels:
Kuih
Thursday, 15 September 2011
Almond Fennel Biscotti
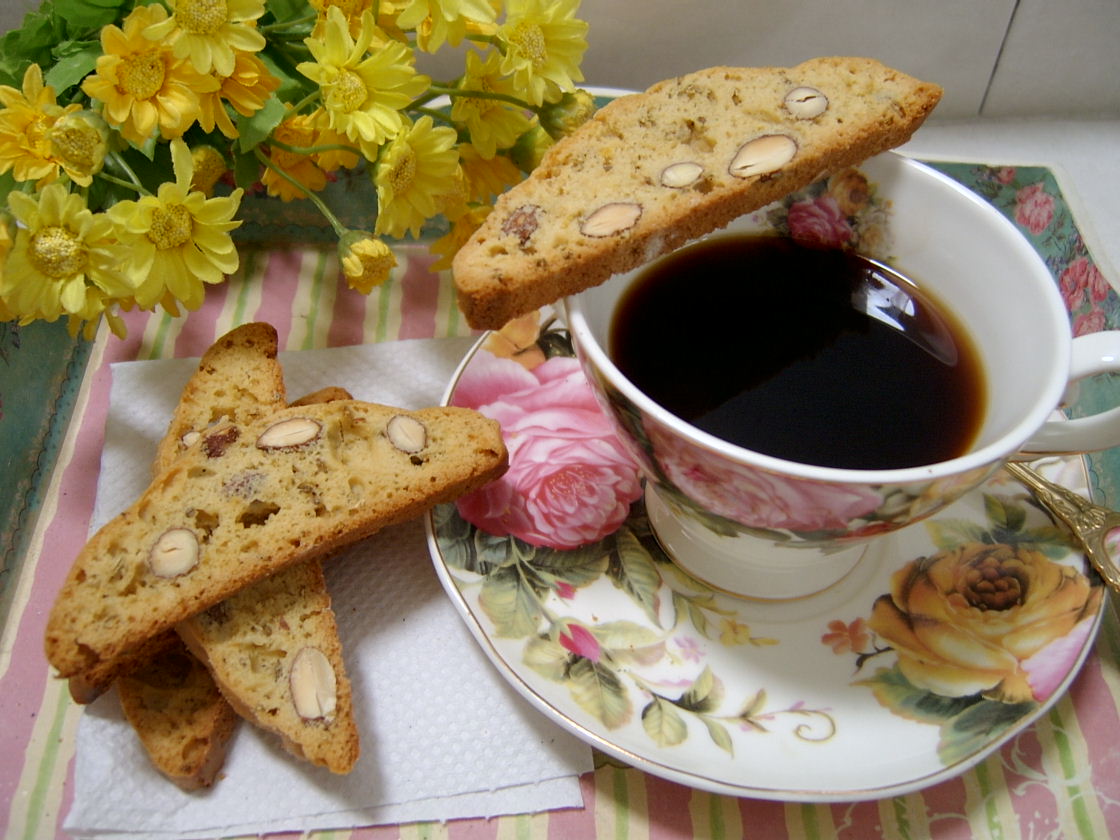
I loves Biscotti as it goes well with a cup coffee. I have made Almond Biscotti before. When I started making biscotti previously, I tried hard making it again and again because of the failure of achieving cutting into thin slices. I have also tried out various different recipes. Some biscotti called for just egg whites which I can't find the aroma taste I wanted in it.
The biscotti I have made , it is hard work when cutting into thin slices but when I have succeed in it, I felt so much of satisfaction and accomplishment in it. I didn't give up and the end result of this is really good because of the crunch when biting.
One day, I was watching a series and the actor was trying to please his girlfriend to bake her favourite Almond Fennel Biscotti. So I thought I would like to give it a try using fennel in my biscotti. And herewith, this is the recipe though I don't find much good texture in it. But who knows, you may like it!
Almond Fennel Biscotti
Ingredients
2 1/2 cups all-purpose flour
1 tbsp baking powder
1 cup whole almonds, lightly toasted
Finely grated 2 lemons
3 large eggs
1 cup granulated sugar
3 tbsp whole fennel seeds
1 tsp vanilla extract
80ml (1/3 cup) vegetable oil
1 egg white, lightly beaten
In medium bowl, sift together flour, baking powder and salt. Stir in fennel seed and almonds.
In large mixing bowl, stir together lemon zest, eggs, sugar and vanilla. Slowly stir in oil. Gradually stir in dry ingredients until just blended. Cover dough with plastic wrap. Let stand 15 minutes.
Line large baking sheet with parchment paper.
Transfer dough to lightly floured work surface. Divide in two. Roll each portion into 14-inch (35-cm) log. Carefully transfer to sheet 4 inches (10 cm) apart. Lightly flatten logs with hands so they are 2-1/2" wide. Brush with egg white.
Bake in centre of preheated 165C oven until lightly golden and just firm in centre, 35 to 40
minutes. Remove from oven. Reduce heat to 150C. Let cool 15 minutes. Carefully transfer to
cutting board. With sharp serrated knife, slice logs 3/4-inch thick. Transfer cookies back to
baking sheet 1/4" apart. Bake until dry on cut sides, 15 to 20 minutes. Cool completely.
Store in airtight container at room temperature up to 1 month.
Good dunking into the coffee!
I will try another different flavours next time! Stay tune.....
The biscotti I have made , it is hard work when cutting into thin slices but when I have succeed in it, I felt so much of satisfaction and accomplishment in it. I didn't give up and the end result of this is really good because of the crunch when biting.
One day, I was watching a series and the actor was trying to please his girlfriend to bake her favourite Almond Fennel Biscotti. So I thought I would like to give it a try using fennel in my biscotti. And herewith, this is the recipe though I don't find much good texture in it. But who knows, you may like it!
Almond Fennel Biscotti
Ingredients
2 1/2 cups all-purpose flour
1 tbsp baking powder
1 cup whole almonds, lightly toasted
Finely grated 2 lemons
3 large eggs
1 cup granulated sugar
3 tbsp whole fennel seeds
1 tsp vanilla extract
80ml (1/3 cup) vegetable oil
1 egg white, lightly beaten
In medium bowl, sift together flour, baking powder and salt. Stir in fennel seed and almonds.
In large mixing bowl, stir together lemon zest, eggs, sugar and vanilla. Slowly stir in oil. Gradually stir in dry ingredients until just blended. Cover dough with plastic wrap. Let stand 15 minutes.
Line large baking sheet with parchment paper.
Transfer dough to lightly floured work surface. Divide in two. Roll each portion into 14-inch (35-cm) log. Carefully transfer to sheet 4 inches (10 cm) apart. Lightly flatten logs with hands so they are 2-1/2" wide. Brush with egg white.
Bake in centre of preheated 165C oven until lightly golden and just firm in centre, 35 to 40
minutes. Remove from oven. Reduce heat to 150C. Let cool 15 minutes. Carefully transfer to
cutting board. With sharp serrated knife, slice logs 3/4-inch thick. Transfer cookies back to
baking sheet 1/4" apart. Bake until dry on cut sides, 15 to 20 minutes. Cool completely.
Store in airtight container at room temperature up to 1 month.
Good dunking into the coffee!
I will try another different flavours next time! Stay tune.....
Wednesday, 14 September 2011
Honey Lemonade Drink
Sometimes when you trying out baking some cookies or any dishes that just only called for lemon zest, what would you do for the whole lemon? Instead of just putting to waste sitting in the fridge waiting to be called for....why not we use it to make lemonade which is a refreshing drink.
2 cups fizzy drink (like 7-Up, soda water)
1/2 cup lemon juice
2-3 tbsp honey
Mix all up together and put in the cocktail drink shaker or a blender to whizz it up . Pour to a glass and some ice cubes.
2 cups fizzy drink (like 7-Up, soda water)
1/2 cup lemon juice
2-3 tbsp honey
Mix all up together and put in the cocktail drink shaker or a blender to whizz it up . Pour to a glass and some ice cubes.
Labels:
Juice
Lamb Hot Pot
I grew up where my mum used to cook stews and braising meat. So I can't run away from having these sumptuous and delicious dishes.
If I am not mistaken if we asked our mum how to cook any dishes, they usually do not have any specific or actual ingredients and they will tell us to put some of these, some of that, a little bit of this and more of that and just cook about how long. And now, we are so lucky that we can always look out for the best recipes through the internet and thereafter we can cook according to our liking in the ingredients in it.
When we have decided to select one of the recipes, there are many ways to cook it too. So, we usually will go according to our taste. Today I have cooked Lamb Hot Pot and the ingredients are more like the Lamb Bourguignon.
Ingredients
You may substitute with 250ml half the beef stock and 250ml red wine for more taste and dark colour in the gravy.
If I am not mistaken if we asked our mum how to cook any dishes, they usually do not have any specific or actual ingredients and they will tell us to put some of these, some of that, a little bit of this and more of that and just cook about how long. And now, we are so lucky that we can always look out for the best recipes through the internet and thereafter we can cook according to our liking in the ingredients in it.
When we have decided to select one of the recipes, there are many ways to cook it too. So, we usually will go according to our taste. Today I have cooked Lamb Hot Pot and the ingredients are more like the Lamb Bourguignon.
Ingredients
600g lamb, cut into small chunks
2 tbsp olive oil
2 onions, peeled and finely chopped
3 large carrots, peeled and sliced
Salt and freshly ground black pepper
500ml beef stock
1/4 cup plain flour
1 tbsp tomato puree
1 bay leaf
1 tsp dried thyme
1 tomato, cut into small pieces
100g white button mushrooms, slice thin
Heat the oil in a large heavy based casserole dish and brown the lamb in batches. Remove
from the pan and set aside.
Add the onions and carrots to the pan and fry gently until soft and golden, about 5
minutes. Put in the plain flour and fry for 20 seconds. Pour half the beef stock in and give
it a good stir. Return the browned lamb into the pot and pour in the remaining stock.
Put in the bay leaf, dried thyme, tomato puree and tomato.
Slow cook till the meat tender, about 2 hours or more.
Heat a frying pan with 1 tbsp olive oil and saute the slice mushrooms till tender. Pour
mushrooms into the lamb hot pot. Serve hot with mashed potatoes or steamed rice.
Labels:
Lamb
Monday, 12 September 2011
Banana Fritters With Coconut
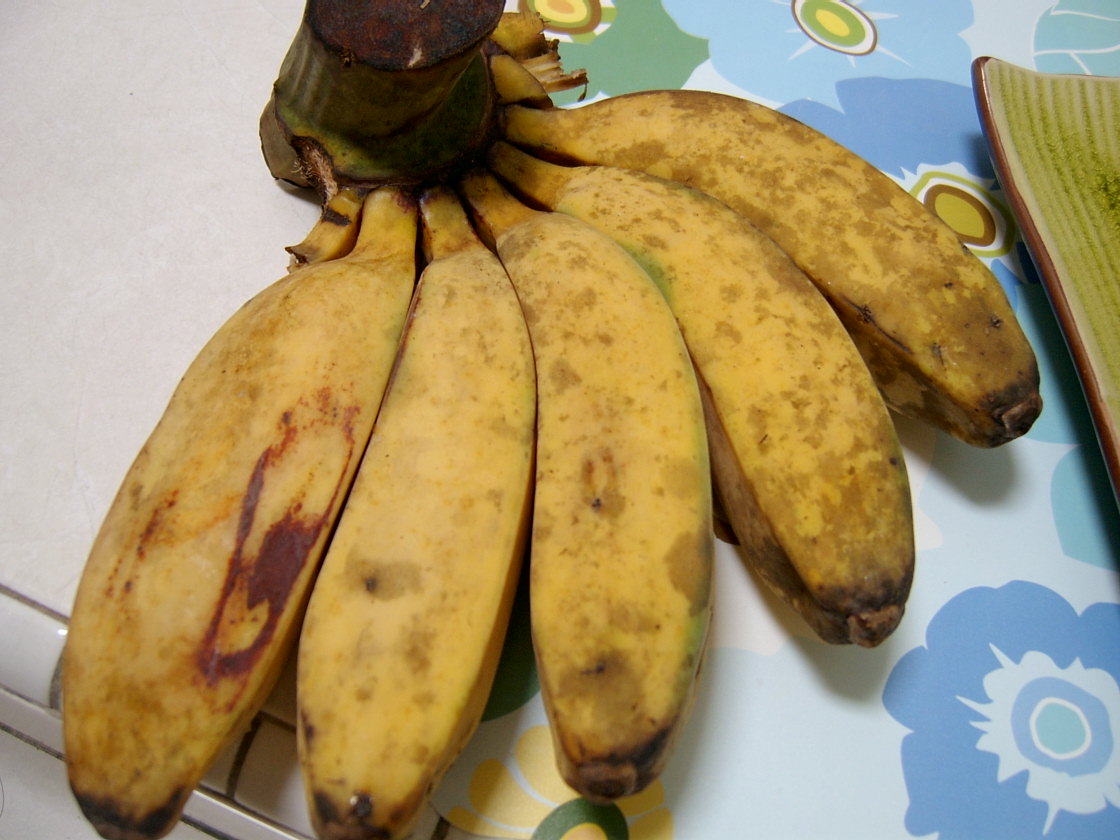
My sister's mother-in-law gave me a bunch of bananas yesterday and I don't know what I should do with it other than deep fry it.. I don't know the exact name of this type of bananas but I know it sure is good with deep fry (goreng pisang). I don't want to just fry the normal "goreng pisang" so I searched into Wendy's blog "Table for 2....or more and I decided to make this yummy Banana Fritters with coconut.
Banana Fritters
Recipes source from Wendy's blog here
So easy to make and good for tea break!
This is the type of bananas I used for this fritters. What is the name of this bananas, anyone?
It is so yummy to eat when it is still warm. Goes well with a cup of tea now!
Banana Fritters
Recipes source from Wendy's blog here
400gm mashed ripe bananas
120gm all purpose flour
1/3tsp baking soda
80gm sugar
100gm freshly grated coconut flesh (if using unsweetened dessicated coconut, use only 20-30g)
A pinch of salt
Oil for frying
1. In a bowl, sift flour with baking soda. Mix in with the bananas, sugar and salt; thereafter in the
dessicated coconut. Combined all well together. Put the batter in the fridge for 15-30 minutes.
2. Heat oil in wok and drop teaspoonful of batter into hot oil.
3. Fry the fritters until golden brown.So easy to make and good for tea break!
This is the type of bananas I used for this fritters. What is the name of this bananas, anyone?
It is so yummy to eat when it is still warm. Goes well with a cup of tea now!
Thursday, 8 September 2011
Blueberry Scones
Right after the scones out from the oven and cooled, I asked my sister to taste one piece whether is it the right texture of the scones that she has tasted before and she said yes! Ah....that's a relieve. And after I finished doing my chores, I go ahead for my piece. One bite right after another, and I can say, it is SOOOO good. It is soft inside and goes well with a cup of coffee. Good for breakfast.
Blueberries Scones
adapted from Martha Stewart siteIngredients
- 2 cups all-purpose flour
- 3 tablespoons sugar, plus more for sprinkling tops
- 1 tablespoon baking powder
- 3/4 teaspoon salt
- 6 tablespoons cold unsalted butter, cut into pieces
- 1 1/2 cups fresh blueberries, picked over and rinsed
- 1 teaspoon grated lemon zest
- 1/3 cup heavy cream, plus more for brushing tops
- 2 large eggs, lightly beaten
Method
1. Preheat oven to 200C, with rack in center. Place a baking mat on a baking sheet, and setaside.
2. In a large bowl, sift together flour, 3 tablespoons sugar, baking powder, and salt. Using a
pastry cutter or two knives, cut in butter until the largest pieces are the size of peas. Stir
in blueberries and zest.
3. Using a fork, whisk together cream and egg in a liquid measuring cup. Make a well in the
center of dry ingredients, and pour in cream mixture. Stir lightly with fork just until
dough comes together. Turn out onto a lightly floured surface, and knead a few times to
mix well.
4. Pat dough into a 6-inch square about 1 1/4 inches thick. Using a floured knife, cut into
four 3-inch squares. Cut squares in half on the diagonal to form eight triangles. Transfer
to prepared baking sheet. Brush tops with cream, and sprinkle with sugar. Bake until
golden brown, 20 to 22 minutes. Transfer scones to wire racks to cool.
Good to eat while it is still warm.
Wednesday, 7 September 2011
Butter Chicken (Another version recipe)
I have cooked Butter Chicken previously and I'm still searching for the right recipe to my taste to what I have tasted in NZ. I have promised myself that I will try to look for one that would suit to my liking and here today I have cooked another version which is quite similar to what I had before.
Well, I could not find any Greek yoghurt here so I just substitute with plain yoghurt instead. The next time if I am going to cook this Butter Chicken again, I will just use half lemon juice instead of 1 whole lemon juice in it. It is a little sour. Probably our local plain yoghurt was a little sour too compare if using the Greek Yoghurt. Other than a little sour, everything is perfect!
This Butter Chicken is adapted from Almost Bourdain
Ingredients
140g (1/2 cup) Greek-style yoghurt
3 cm piece ginger, peeled, finely grated
2 cloves garlic, crushed
2 tbsp garam masala
1 lemon, juiced (Used only half lemon juice would be enough)
2 tbsp olive oil, plus extra, to grease
1/4 cup roughly chopped coriander, plus extra leaves, to serve
800g chicken thigh fillets, cut into 3 cm-wide strips
2 tbsp ghee ( I used butter instead)
2 onions , thinly sliced
1 tsp ground turmeric
1 1/2 tbsp tomato paste
2 long red chillies, seeded, finely chopped (you can use 1 tsp chilli powder)
260g (1 cup) passata (sieved pureed tomatoes)
300 ml pouring cream
1 bunch mint, leaves picked, finely chopped
Method
1. Combine yoghurt, ginger, garlic, 1 tbsp garam masala, lemon juice, oil and half the coriander in a large
bowl, then season with salt and pepper. Add chicken and toss to coat. Cover with plastic wrap and
refrigerate for 3 hours.
2. Preheat a lightly greased barbecue or chargrill pan over medium-high heat. Remove chicken from
marinade and cook, in 2 batches, turning for 6 minutes or until almost cooked through.
3. Heat ghee in a large saucepan over medium heat, add onions, turmeric, tomato paste, chillies and
remaining garam masala, and cook, stirring, for 5 minutes or until onions are soft. Add passata and cook
for 5 minutes or until thickened slightly. Reduce heat to low, add cream, mint and remaining coriander, and
cook, stirring, for 2 minutes. Add chicken and simmer, stirring occasionally, for 15 minutes or until sauce
thickens. Scatter with extra coriander and serve with rice and pappadams.
Well, I could not find any Greek yoghurt here so I just substitute with plain yoghurt instead. The next time if I am going to cook this Butter Chicken again, I will just use half lemon juice instead of 1 whole lemon juice in it. It is a little sour. Probably our local plain yoghurt was a little sour too compare if using the Greek Yoghurt. Other than a little sour, everything is perfect!
This Butter Chicken is adapted from Almost Bourdain
Ingredients
140g (1/2 cup) Greek-style yoghurt
3 cm piece ginger, peeled, finely grated
2 cloves garlic, crushed
2 tbsp garam masala
1 lemon, juiced (Used only half lemon juice would be enough)
2 tbsp olive oil, plus extra, to grease
1/4 cup roughly chopped coriander, plus extra leaves, to serve
800g chicken thigh fillets, cut into 3 cm-wide strips
2 tbsp ghee ( I used butter instead)
2 onions , thinly sliced
1 tsp ground turmeric
1 1/2 tbsp tomato paste
2 long red chillies, seeded, finely chopped (you can use 1 tsp chilli powder)
260g (1 cup) passata (sieved pureed tomatoes)
300 ml pouring cream
1 bunch mint, leaves picked, finely chopped
Method
1. Combine yoghurt, ginger, garlic, 1 tbsp garam masala, lemon juice, oil and half the coriander in a large
bowl, then season with salt and pepper. Add chicken and toss to coat. Cover with plastic wrap and
refrigerate for 3 hours.
2. Preheat a lightly greased barbecue or chargrill pan over medium-high heat. Remove chicken from
marinade and cook, in 2 batches, turning for 6 minutes or until almost cooked through.
3. Heat ghee in a large saucepan over medium heat, add onions, turmeric, tomato paste, chillies and
remaining garam masala, and cook, stirring, for 5 minutes or until onions are soft. Add passata and cook
for 5 minutes or until thickened slightly. Reduce heat to low, add cream, mint and remaining coriander, and
cook, stirring, for 2 minutes. Add chicken and simmer, stirring occasionally, for 15 minutes or until sauce
thickens. Scatter with extra coriander and serve with rice and pappadams.
Labels:
chicken
Subscribe to:
Posts (Atom)